Wednesday, 31 March 2021

Spiced Courgette and Orange Cake

Had a couple of courgettes that needed using so I’ve used one for this recipe and have another for something else I’m plotting. 


Spiced Courgette and Orange Cake:


INGREDIENTS:

150ml vegetable oil 

175g caster sugar 

3 large eggs

1 tsp vanilla 

1.5tsp almond extract 

Zest from a large orange 

300g self raising flour 

1/2tsp bicarbonate of soda

1tsp cinnamon 

1/2tsp nutmeg 

250g courgette, coarsely grated 

For the icing:

200g icing sugar 

Juice from half a large orange 

Rainbow sprinkles 


METHOD:

1) Preheat the oven to 180*C/160*C fan

2) Grease a 10 inch bundt tin

3) Mix the sugar, zest, oil, eggs and vanilla and almond extracts

4) Add the flour, bicarbonate, cinnamon and nutmeg and mix

5) Add the courgette and mix

Pour into the bundt tin and level the mixture 

6) Bake for 35 minutes 

7) Allow to cool in the tin for 5 minutes before turning onto a wire rack to cool completely 

8) For the icing, just mix the icing sugar and orange juice till smooth and thick. Add more or less orange juice to get the consistency you want. It should be a thick but still runny consistency. 

9) Once the cake is fully cooled, drizzle the icing over it and let it run down the sides.

10) Top with sprinkles. 


Thursday, 25 March 2021

Deep Dish Apple Pie with a Lattice Top


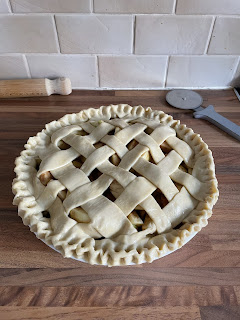
 Deep Dish Apple Pie with a Lattice Top


This makes one HUGE pie with lots and lots of fruit filling - I like mine chunky so it stays a little firm in the middle but cut it however you like. 


My first attempt at a lattice top and while it’s not perfect I’m really proud of it and it was FAR EASIER than I thought it would be. 


Different pie crust recipe than I usually use and I’m converted! Secret ingredient is a tiny bit of white vinegar. Yes you read that right VINEGAR! You cannot taste it in the end product but it does something magical to make the crust extra crisp and means you can use less fat - so you can feel less guilty about the big dollop of custard/cream/ice cream we all know you’re gonna want to have with this! Just trust me and go with it - it’s worth it.  I promise. 


I find it easiest to talk about the apple filling by the number of apples I used. I find recipes that say 450g prepared apples etc. fairly unhelpful, as it’s hard to work out how many fruits you will actually need once you’ve discounted the skins and cores. 


I used a large deep Pyrex dish, measuring 9 inches or 23cm across but you can use whatever you like as long as it’s oven safe and has a small lip on the edge to let you get the crimp.


I’ve always crimped my pies etc. Using a fork but the difference using my hands made was amazing to the look of the finished pie and it really held up when cutting to serve. 


The lattice top looks super complicated. It isn’t! Super straightforward and literally took 5-10 mins of my time. Also means I get to use less pastry so feeling even more virtuous (second scoop of ice cream anyone?).


INGREDIENTS:

Pastry:

3/4 cup (170g) butter or solid vegetable fat like Trex plus extra to grease pie dish

3 cups (435g) plain flour 

1/2tsp salt

1 large egg, beaten

5tbsp ice cold water

1tbsp white vinegar 


Plus a little beaten egg to brush the top


Apple Filling:

4 Granny Smith Apples, peeled, cored and cut into large chunks/segments 

5 Gala apples, peeled, cored and cut into large chunks/segments 

Lemon juice to stop apples going brown 

1/2 cup (100g) brown sugar

1-2tbsp cornflour 

2tsp ground cinnamon 

1/2tsp freshly grated nutmeg 

Pinch salt


METHOD:

1) For the pastry, put the flour and salt into a large bowl and add the cubed butter/Trex. 

2) Rub the fat into the flour till it looks like fine breadcrumbs. 

3) Add the beaten egg, water and vinegar and gently mix until combined. Be careful not to overwork the dough - overworking develops the gluten in the flour and makes your pastry tough instead of short and crumbly. 

4) You might need to add a little more water to bring the mixture together as a soft dough depending on your flour, the humidity of your kitchen, how you store your ingredients etc. If you do, add it a tiny bit at a time to avoid ending up with a sloppy mess. 

5) Once you’ve made the dough, split it into two rough discs (one for the pie base and one for the lattice lid) with one slightly larger than the other. Wrap both discs of dough in clingfilm and pop in the fridge for a minimum of 45 mins to chill and relax. 

6) While your pastry bid chilling, you can prepare your filling. I always sprinkle the cut apples in the bowl, with some lemon juice as I’m finished peeling and chopping to stop them turning brown. 

7) In a large bowl, mix the apples with the sugar, cornflour and spices. 

Grease your pie dish and pre-heat your oven to 200*C.

8) Now to roll out the pastry. I use clingfilm to sandwich the dough which means I don’t need to use flour on the bench. So much easier and far less messy. The other benefit is that you can use the clingfilm underneath to help lift your pastry and flip it to press into your pie dish and this becomes even more vital when doing the lattice top. 

9) Roll out your larger disc of pastry till it’s really thin, thinner than most recipes suggest which is the thickness of a pound coin. I go for the thickness of a 2p! This means the pastry is beautifully thin and crisp and avoids the dreaded soggy bottom. You can’t do this if you don’t use the clingfilm as it will just crack as the dusting flour would dry it out. The pastry should be rolled out large enough to cover the base of your pie dish, comfortably cone up the sides and slightly overhang the edge of the dish. Once rolled out you can pick up your pastry and flip it over with the clingfilm face up and then press down gently to get the pastry into all the edges of your dish. Then remove the clingfilm once you’re happy with the base. 

10) Gently transfer your apple mixture into the dish taking care not to pierce the thin pastry base.

11) Now roll out the smaller disc of pastry between clingfilm to the same thickness as before and ensure that it will cover the top of the pie. 

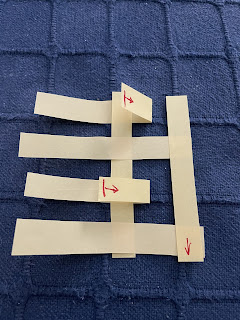
12) You then use a knife or pizza cutter to cut the pastry into evenly spaced strips. 

13) Carefully remove every other strip of pastry and lay them out on another piece of clingfilm. These are your vertical weavers. 

14) Go back to the original strips that are now evenly spaced. These are your horizontal weavers. 

15) Now we’re going to start to weave the lattice. 


16) On the horizontal strips, fold back every other strip on itself, about halfway. Then lay one of the vertical strips across them. Then fold the horizontal strips back down. 

17) Now fold back the other horizontal strips and add another vertical, with a little gap between the verticals. 

18) Repeat this process till you reach the end. Then fold back the horizontals from the other end to add the vertical strips to the other half of the lid.

19) Then I gently press down to help all the strips stick to each other and then use the clingfilm to lift up the lattice and flip it over to apply to the top of the pie.

20) Gently press down to stick the lattice to the edge of the base and tuck any overhanging ends under.


21) And now to crimp the edge. Use your forefinger and thumb on your left hand to make a little V to pinch the edge and then use your forefinger on your right hand to push from the other side . 22) Repeat around the entire edge. 

23) Gently brush the lattice and crimped edge with beaten egg.

24) Pop in the oven and bake at 200*C for 15 minutes. Then turn the oven temperature down to 175*C and continue to bake for 35-45 minutes until the pastry is golden and crisp and the fruit it soft. 

25) Let it cool slightly before serving as it will cut better but it’s absolutely best served warm. 

Custard, cream, ice cream ...? Your choice! 

Saturday, 20 March 2021

Giant Carrot and Potato Hash Brown Pancakes topped with fried eggs

Okay so we have somehow ended up with a huge glut of carrots in our house so expect lots of recipes using them up this week. 


This took a bit of time but it wasn’t hard at all ... okay maybe the flipping was a little tricky but I have my own tricks to make it foolproof. 


I used my food processor to grate the veggies because, well why not? It saved me a bunch of work. But of course you can totally use a box grater and do them by hand. 


Also, to make sure these are properly cooked through, I start these in the pan but finish them in the oven. Nothing more disappointing than a hash brown that’s raw in the middle. 


INGREDIENTS:

2 medium floury skin on potatoes, coarsely grated

1 large carrot, peeled and coarsely grated

1 red onion, finely chopped 

3tbsp plain flour 

Salt and pepper 

Oil for frying 


1-2 eggs


METHOD:


1. Put the grated carrots and potatoes into the middle of a clean tea towel, bring up the sides and squeeze out as much excess liquid as possible over a bowl or the sink. If you don’t get the extra water out, your hash browns will steam/boil instead of frying. Tip the drained veggies into a clean dry bowl.


2. Add the chopped onion, salt and pepper, and the flour. Stir everything together till it’s all lightly coated in flour. You don’t want it to be powdery, just enough flour to bind the veggies together a bit, so it should be a little sticky from the residual moisture on the veg.


3. Pre-heat the oven to 200*C and line a baking tray with greaseproof paper.


4. Add a little oil to a moderate hot non-stick frying pan, add the mixture and quickly spread it out and press it down with a spatula to make a solid even layer. Fry on a low-medium heat for 5 mins or so until the surface touching the pan is golden and crisp. You are trying to start the hash brown cooking through, not just build colour. It should be a little set on the cooked side before you try flipping it otherwise it will just fall to bits. 


5. To flip, take the pan off the heat.  Put your sheet of greaseproof paper over the top of the pan and place your baking tray face down on top. Keeping you hand on the bottom of the tray to keep it in place over the pan, confidently and quickly flip everything over. Now the uncooked side of your pancake is face down on the greaseproof and the cooked side is face up. 


6. You then quickly and gently slide the pancake off the greaseproof back into the pan with the cooked side facing up.  You shouldn’t need to push it off the greaseproof, just tilt the tray till gravity pulls it down off the tray for you.


7. Fry again for 5 minutes or so, then slide it out of the pan back onto the greaseproof lined tray and pop it in the oven till it’s crispy and golden and cooked through. 10-15 mins max.


8. Serve the hash brown pancake topped with fried eggs. 

Saturday, 13 March 2021

My Signature Carrot Cake with Orange Cream Cheese Icing


 My Signature Carrot Cake with Orange Cream Cheese Icing


Okay, I’m going to let you all in on a secret....shhh don’t tell everybody else though. This is so good you’ll want to keep it as your own family secret. 


Seriously though, this is actually my favourite cake. But it’s also my mam’s all time favourite cake and mother defo knows best in this case. You can keep your chocolate fudge cake and Victoria sponges! This baby has converted carrot cake haters and brought flavourful joy to many of my friends and family at birthdays and parties. 


This bad boy is nut-free and can be dressed up to make an amazing celebration cake, without any of that sugary armour-like rolled out royal icing. I used this recipe to make a large tiered ‘naked’ cake for my mam’s 60th birthday party. It was enormous! And literally everyone went back for seconds including those aforementioned carrot cake haters. Zero leftovers! 


It is ALWAYS moist but beautifully buttery as well. My secret? Where a traditional carrot cake uses oil in place of butter or margarine, I use half oil and half proper butter - you get the moist texture from the oil and the gorgeous rich flavour from butter. 


My other twist is that where other recipes use walnuts which I find dry, bitter and stony in the sponge, I soak sultanas in fresh orange juice and zest to add little juicy flavour bombs throughout the cake. 


So have I convinced you yet, that this cake will change your life? 


Shall we begin?


INGREDIENTS:


For the sponge:

225g light muscovado sugar 125ml sunflower oil 

125g softened butter

4 large eggs 

1tsp vanilla extract 

300g self-raising flour 

2tsp baking powder 

1tsp ground cinnamon 

0.5tsp fresh grated nutmeg 

1tsp ground mixed spice

200g carrots, peeled and coarsely grated, tossed with 2tbsp of the flour

75g Sultanas 

Zest and juice of a large orange 


For the Icing:

40g butter (room temperature) 

500g icing sugar 

180g full-fat cream cheese (room temperature)

1tsp vanilla extract 

Zest of a large orange plus a little of the juice (varies depending on texture you want)


METHOD:

  1. Put the Sultanas in a bowl and add the orange juice and zest and leave to soak for a minimum of an hour but overnight is best. 
  2. Preheat the oven to 180*C/160*C fan. And line and grease two 8 inch sandwich tins. 
  3. Put a couple of tablespoons of the flour in a bowl with the grated carrots and stir up till they’re all coated in a little flour. TIP: This helps to stop the carrots from sinking to the bottom of the mixture in the oven. It also works for recipes using things like blueberries or chocolate chips etc. 
  4. Cream the butter and sugar together till fluffy and paler. (It won’t be super fluffy as there’s less butter than you’d normally use for a creamed method. But you just need to beat it till the sugar is starting to dissolve and it’s a bit airier.)
  5. Then beat in the oil, and once blended, add the eggs and vanilla and beat in. 
  6. Sift in the flour, baking powder and spices and gently stir together. Don’t overmix or you’ll develop the gluten in the flour and end up with a rubbery cake. 
  7. Add the carrots, Sultanas and zest plus any of the juice that didn’t soak into the fruit. 
  8. Gently mix till fully combined, again taking care not to overmix. 
  9. Divide the mixture between the sandwich tins and level off making a small dip in the centre to counteract how the cake will naturally rise more in the middle when it’s in the oven.
  10. Bake for 35-40 mins until they’re risen and a skewer or cake tester comes out clean when inserted into the centre. 
  11. Set aside to cook fully on a wire rack. 
  12. For the icing, beat the butter and cream cheese together with the orange zest and vanilla till smooth. 
  13. Add the icing sugar and beat in till smooth. TIP: start your mixer/whisk off on its lowest setting and drape a clean tea towel over the bowl and whisk/mixer to try and contain the icing sugar cloud that will inevitably be thrown up into the air. Otherwise you’ll wind up breathing in a lovely sugary fog. 
  14. Depending on how thick or runny your icing is, add a few drops of orange juice. Be really careful not to add too much liquid or you’ll end up with a lovely orange cream cheese soup. 
  15. Use the icing to sandwich the fully cooled sponges together and then cover the top and sides with the icing using a palette knife. 
  16. Decoration ideas: a) ribbons of candied carrot (boiled in sugar syrup) rolled into rosettes, b) sugar craft mini carrots, c) fresh flowers with the stems wrapped in tin foil. 

Egg-Topped Fridge Gravel Hash - Brunch with Some Bite!

This little beauty is a one pan dish cooked in 5 stages. Super easy and very satisfying. With a good punch! P.S. you can make this as spicy or mild as you like. For a vegetarian twist, ditch the bacon and top with salty feta before the egg or even fry up some halloumi instead! For a vegan version you could skip the butter and eggs and instead add some tofu and/or beans to the hash to amp up the protein and top with a rich spicy tomato salsa. Totally adaptable and great for using up leftovers. 


This recipe is totally flexible and can be made with whatever vegetables you have kicking around your fridge even if they’re clearly past their best (aka Fridge Gravel). In my case it was:


A sad looking courgette that was starting to go dimply, chopped

4 spring onions with very floppy green ends, chopped 

A green pepper that had seen better days, chopped 

A couple of rashers of smoked back bacon leftover from the pack after hubby’s bacon sarnie earlier in the week, chopped

3 floury potatoes, skin on and chopped

a fresh-ish jalapeño, with the seeds, chopped

The tail end of some garlic purée

4 eggs that needed to be used today


Extras:

Oil for frying 

Butter also for frying 

Salt and pepper 

Sriracha, to serve


METHOD:

  1. add 1tsp oil to a large hot frying pan, add the courgette, peppers, spring onions and jalapeño and gently fry till all the veg is tender and starting to go brown around the edges. Then add a little garlic purée. I don’t add it at the start in case it burns. Cook for a minute and then scrape everything out of the pan into a large bowl for later.
  2. Fry the bacon till crispy in the now empty pan. Once cooked, set aside in the bowl with the veggies. Cover with foil to keep everything warm.
  3. Add a little more oil to the pan and fry the chopped potatoes, don’t put the heat too high as you want the potatoes cooked through and if the heat is too high, they’ll burn before they’re cooked. If I had a lid for my frying pan I’d use it at this point to keep the heat in the pan, but I don’t so a bit of tin foil draped over the pan did the job just fine. Once the potatoes start to soften in the middle add a teaspoon of butter and stir them up. The butter helps the edges brown and of course adds a buttery flavour.
  4. Once the potatoes are golden and crispy, you add the veggies and bacon back to the pan and stir them in to help all the flavours combine. Add a little salt and pepper and and then serve onto the plates and tent them with foil to keep them warm while you fry the eggs.
  5. Fry eggs in a little oil and once cooked, serve over the hash filled plates. Then drizzle with sriracha.  TA DA!

Sunday, 7 March 2021

Spicy vegetable and bean soup


Totally veggie and if you skip the cheese it’s vegan. 

INGREDIENTS:

1tsp Oil

Onion finely chopped

Carrots finely chopped 

Courgette finely chopped 

1tsp Garlic purée 

1/2 cup frozen sweet corn 

1 can baked beans 

Taco seasoning 

1 jalapeño split and deseeded 

1 can chopped tomatoes 

1 veggie oxo cube

750-1000ml water

Tabasco sauce (to taste)

Few drops of lime juice

Finely chopped coriander (I used frozen)

Salt and pepper 


METHOD:

1) gently fry the onion, courgette and carrots till starting to soften 

2) add the spices and jalapeño stir till the spices start to toast

3) add the garlic purée, sweetcorn, baked beans with sauce, and tinned tomatoes.

4) add the stock cube and water, salt and pepper, Tabasco, lime juice and coriander then bring to a boil and simmer for 15-20 mins. 

5) serve with toppings of your choice. 


Thursday, 4 March 2021

Spiced Beef Hotdish with jalapeño and cheddar cornbread dumplings


 Spiced Beef Hotdish with jalapeño and cheddar cornbread dumplings:

INGREDIENTS:

For the Spiced Beef Hotdish:

Stewing beef

1 Onion, chopped 

2 Carrots, chopped

2 cloves of garlic, peeled and minced

2 fresh jalapeños deseeded and finely chopped

1/2 cup Sultanas

1 tin Kidney beans, drained

1 tin Cannelini beans, drained

Tin chopped tomatoes 

Beef stock cube

1 cup water

1tbsp Baharat spice blend


For the Cornbread Dumplings:

Dry ingredients:

1 cup plain flour

1 cup fine cornmeal 

1/2tsp bicarbonate of soda

1tsp baking powder

Salt and pepper 


Flavour:

1-2 jalapeños deseeded and finely chopped

1/2 cup grated cheddar


Wet ingredients:

115g melted butter

2 medium eggs

1 cup Greek yogurt 


METHOD:

  1. For the Spiced Beef Hotdish, chuck everything into a slow cooker and cook on low for 8hrs.
  2. Preheat the oven to 180*C
  3. While the oven is heating up make the cornmeal dumplings.
  4. Put all the dry ingredients into a large bowl and mix up.
  5. Add the flavour ingredients but reserve a little of the cheese to sprinkle on top.
  6. Mix the flavour ingredients in so they’re well distributed. The flour coating these will help to prevent them from sinking to the bottom of the mixture in the oven.
  7. Add the wet ingredients and mix till just combined.
  8. Transfer the stew from the slow cooker to a large ovenproof dish, and top with scoops of the cornbread mixture. 
  9. Sprinkle over the remaining cheese.
  10. Bake for 20 mins till the cornbread is fluffy inside and crispy and golden outside.