Deep Dish Apple Pie with a Lattice Top
This makes one HUGE pie with lots and lots of fruit filling - I like mine chunky so it stays a little firm in the middle but cut it however you like.
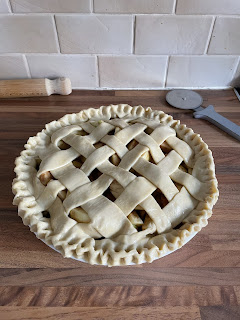
My first attempt at a lattice top and while it’s not perfect I’m really proud of it and it was FAR EASIER than I thought it would be.
Different pie crust recipe than I usually use and I’m converted! Secret ingredient is a tiny bit of white vinegar. Yes you read that right VINEGAR! You cannot taste it in the end product but it does something magical to make the crust extra crisp and means you can use less fat - so you can feel less guilty about the big dollop of custard/cream/ice cream we all know you’re gonna want to have with this! Just trust me and go with it - it’s worth it. I promise.
I find it easiest to talk about the apple filling by the number of apples I used. I find recipes that say 450g prepared apples etc. fairly unhelpful, as it’s hard to work out how many fruits you will actually need once you’ve discounted the skins and cores.
I used a large deep Pyrex dish, measuring 9 inches or 23cm across but you can use whatever you like as long as it’s oven safe and has a small lip on the edge to let you get the crimp.
I’ve always crimped my pies etc. Using a fork but the difference using my hands made was amazing to the look of the finished pie and it really held up when cutting to serve.
The lattice top looks super complicated. It isn’t! Super straightforward and literally took 5-10 mins of my time. Also means I get to use less pastry so feeling even more virtuous (second scoop of ice cream anyone?).
INGREDIENTS:
Pastry:
3/4 cup (170g) butter or solid vegetable fat like Trex plus extra to grease pie dish
3 cups (435g) plain flour
1/2tsp salt
1 large egg, beaten
5tbsp ice cold water
1tbsp white vinegar
Plus a little beaten egg to brush the top
Apple Filling:
4 Granny Smith Apples, peeled, cored and cut into large chunks/segments
5 Gala apples, peeled, cored and cut into large chunks/segments
Lemon juice to stop apples going brown
1/2 cup (100g) brown sugar
1-2tbsp cornflour
2tsp ground cinnamon
1/2tsp freshly grated nutmeg
Pinch salt
METHOD:
1) For the pastry, put the flour and salt into a large bowl and add the cubed butter/Trex.
2) Rub the fat into the flour till it looks like fine breadcrumbs.
3) Add the beaten egg, water and vinegar and gently mix until combined. Be careful not to overwork the dough - overworking develops the gluten in the flour and makes your pastry tough instead of short and crumbly.
4) You might need to add a little more water to bring the mixture together as a soft dough depending on your flour, the humidity of your kitchen, how you store your ingredients etc. If you do, add it a tiny bit at a time to avoid ending up with a sloppy mess.
5) Once you’ve made the dough, split it into two rough discs (one for the pie base and one for the lattice lid) with one slightly larger than the other. Wrap both discs of dough in clingfilm and pop in the fridge for a minimum of 45 mins to chill and relax.
6) While your pastry bid chilling, you can prepare your filling. I always sprinkle the cut apples in the bowl, with some lemon juice as I’m finished peeling and chopping to stop them turning brown.
7) In a large bowl, mix the apples with the sugar, cornflour and spices.
Grease your pie dish and pre-heat your oven to 200*C.
8) Now to roll out the pastry. I use clingfilm to sandwich the dough which means I don’t need to use flour on the bench. So much easier and far less messy. The other benefit is that you can use the clingfilm underneath to help lift your pastry and flip it to press into your pie dish and this becomes even more vital when doing the lattice top.
9) Roll out your larger disc of pastry till it’s really thin, thinner than most recipes suggest which is the thickness of a pound coin. I go for the thickness of a 2p! This means the pastry is beautifully thin and crisp and avoids the dreaded soggy bottom. You can’t do this if you don’t use the clingfilm as it will just crack as the dusting flour would dry it out. The pastry should be rolled out large enough to cover the base of your pie dish, comfortably cone up the sides and slightly overhang the edge of the dish. Once rolled out you can pick up your pastry and flip it over with the clingfilm face up and then press down gently to get the pastry into all the edges of your dish. Then remove the clingfilm once you’re happy with the base.
10) Gently transfer your apple mixture into the dish taking care not to pierce the thin pastry base.
11) Now roll out the smaller disc of pastry between clingfilm to the same thickness as before and ensure that it will cover the top of the pie.
12) You then use a knife or pizza cutter to cut the pastry into evenly spaced strips.
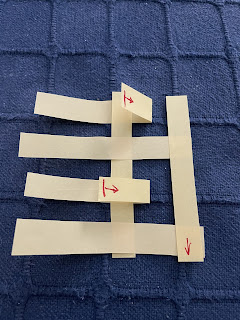
13) Carefully remove every other strip of pastry and lay them out on another piece of clingfilm. These are your vertical weavers.
14) Go back to the original strips that are now evenly spaced. These are your horizontal weavers.
15) Now we’re going to start to weave the lattice.
16) On the horizontal strips, fold back every other strip on itself, about halfway. Then lay one of the vertical strips across them. Then fold the horizontal strips back down.
17) Now fold back the other horizontal strips and add another vertical, with a little gap between the verticals.
18) Repeat this process till you reach the end. Then fold back the horizontals from the other end to add the vertical strips to the other half of the lid.
19) Then I gently press down to help all the strips stick to each other and then use the clingfilm to lift up the lattice and flip it over to apply to the top of the pie.
20) Gently press down to stick the lattice to the edge of the base and tuck any overhanging ends under.
21) And now to crimp the edge. Use your forefinger and thumb on your left hand to make a little V to pinch the edge and then use your forefinger on your right hand to push from the other side . 22) Repeat around the entire edge.
23) Gently brush the lattice and crimped edge with beaten egg.
24) Pop in the oven and bake at 200*C for 15 minutes. Then turn the oven temperature down to 175*C and continue to bake for 35-45 minutes until the pastry is golden and crisp and the fruit it soft.
25) Let it cool slightly before serving as it will cut better but it’s absolutely best served warm.
Custard, cream, ice cream ...? Your choice!


No comments:
Post a Comment