Sunday, 4 October 2020

Super-sized, super cheesy, cheese scones

So I was about to start baking and hubby says: “if you’re doing cheese scones can you do me at least one big one? Sorry just not a fan of the little ones you’ve made recently.”

So what’s a girl to do in response to that...?!

Well basically...THIS! 

I make cheese scones fairly regularly but these are my best yet. Quite a few little additions but I really turned the volume up flavour-wise.  It’s a scaled up variation on a basic recipe from the Be-Ro book but with Some extras to bring out the flavour in the cheese. 


INGREDIENTS:

700g self-raising flour 

1/2tsp salt

1/2tsp white pepper 

1/2tsp onion granules

1tsp dried thyme 

1/2tsp smoked paprika 

1/4tsp freshly grated nutmeg

100g butter/margarine 

300g grated Red Leicester

6 eggs beaten

180ml milk

Topping:

1 egg beaten with 60ml milk

100g grated Red Leicester 


METHOD:

1) Pre-heat oven roasted 200*C

2) thoroughly mix the seasoning ingredients with the flour so all the flavours are well distributed throughout 

3) rub the butter into the flour

4) add the 300g cheese and mix in well 

5) beat the eggs and milk together and add to the dry ingredients and mix well to bring together as a slightly sticky dough. Try not to overwork the mixture otherwise you’ll get tough scones 

TIP: add the egg and milk mixture a bit at a time as you mix it into the flour mixture. The original recipe used only 4 eggs but I couldn’t get it to come together with that as it was far too dry so add the wet mix as needed rather than all in one go. 

6) turn the dough out onto a lightly floured surface or one lined with clingfilm (which is my preference, less messy and avoids adding more flour making the mixture too dry) 

7) gently roll out the mixture to around 2-3cm thick then cut out circles using a lightly floured cutter and place onto a lined baking tray

8) brush the tops of the scones with the remaining egg and milk mixture then top with grated cheese from the 100g

9) bake for 13-15 minutes till they’ve risen slightly and the cheese is melted and golden 

10) Cool on a wire rack or enjoy them still warm from the oven. Serve with butter


Sunday, 20 September 2020

Peanut butter and jam cookies


 Makes 16 enormous cookies

  • 185 g Plain flour
  • 1 tsp baking powder
  • 125 g softened butter 
  • 200 g smooth peanut butter
  • 185 g brown sugar
  • 2 tbsp milk
  • 1 egg
  • 100 g jam


1) pre-heat the oven to 180*C
2) beat butter, peanut butter and sugar together till fluffy
3) add the egg, milk and vanilla and mix in
4) add the flour and baking powder and mix in
5) use an ice cream/mashed potato scoop to put scoops of the mixture onto lined baking trays. Make sure to leave plenty of space around each one as they’ll spread slightly when cooking
6) dip a teaspoon measuring spoon into cold water and use the back of it to make a little divot in the middle of each cookie -wetting the spoon again after each one. The water on the spoon stops it from sticking 
7) add a teaspoon of jam to the dip you’ve created. 
8) bake for 10-12 mins or till light golden brown 
9) cool for a couple of minutes on the tray before transferring to a wire rack to cool fully


Sunday, 6 September 2020

Spiced Cranberry and Orange Muffins

 Spiced Cranberry and Orange Muffins


Makes 20-24 muffins! 


Well it’s September so that means Autumn is upon us. A fact I am far too excited about! My favourite season by far, leaves turning the most amazing colours, bright crisp mornings, Bonfire Night and Halloween, toffee apples, or just apples and pears in season, cosy comfort food and snuggly nights in watching the wind and rain from indoors. Okay okay...I’ll stop! 


One of my favourite autumnal flavour combos for sweet baking is orange and cranberry with sweet warming spices so I decided to knock up some muffins with those flavours.  They do not disappoint if I do say so myself. 


This recipe uses orange zest and juice but I didn’t have an orange so I substituted it for the zest and juice of two lovely sweet satsumas/easy-peelers just be careful when grating the zest not to rip the whole skin off. 


Ingredients:

100g dried cranberries 

Zest and juice of a large orange/2 satsumas etc.

2 eggs

125ml oil (not extra virgin olive oil as it’s too strong flavoured)

250ml milk

125g caster sugar and 125g soft brown sugar (or just 250g caster sugar, the brown sugar just adds a caramel note)

400g self raising flour

Pinch salt

1.5 tsp ground cinnamon 

0.5 tsp freshly grated nutmeg


Method:


In a little bowl, soak the cranberries in the orange zest and juice while you do the rest of the recipe. It just helps them to plump up a little and they absorb a little of the citrus flavour and become like little fruity bombs in the muffins. 


Preheat the oven to 180*C fan


Break the two eggs into a large bowl/bowl of a stand mixer and whisk on high speed for one minute till they are full of bubbles and fluffy.


Add the oil and milk and whisk till combined. 


Then add the sugar and whisk again till the mixture is smooth.


Add the flour, salt, cinnamon and nutmeg and mix in till just mixed.


Add the cranberries, zest and orange juice. Whisk in briefly till it’s just mixed.


Scoop into paper cases in a muffin tin.


Bake for 15-20 mins till a skewer/cocktail stick comes out clean.


Allow to cool in the tin for 10 mins then turn out onto a wire rack to fully cool.


TIP: For a crispy top you could add a teaspoon of Demerara sugar to the top of each muffin right before they go in the oven. Or you can ice them with a drizzle icing which is just a mixture of icing sugar and orange juice and zest. 

Spicy Egg Parcel (breakfast/brunch/lunch/dinner/midnight munchies!) (V)

 Spicy Crispy Egg Parcel (breakfast/brunch/lunch/dinner/midnight munchies!) 

Serves 1

Vegetarian 


I promise these look trickier than they are to make. Also, nice to have a veggie cooked breakfast to draw on especially if you’ve got lovely vegetarians in your life. 


Looking in the fridge today trying to decide what on earth I wanted for breakfast/lunch and just started grabbing stuff and decided to just play and see what I could come up with. Pretty chuffed with the eventual product. I’d say it was a successful experiment! 


INGREDIENTS:

1tsp max cooking oil

1/4 diced red pepper 

1 chopped spring onion

3 medium eggs beaten

Pinch each of smoked paprika, dried chilli flakes, dried oregano, salt and pepper 

40g finely grated cheese (I used Red Leicester)

Wheat flour tortilla wrap 

Sriracha (to your taste)

Non stick pan

Greaseproof/baking paper


METHOD:

Fry off a little diced red pepper and chopped spring onions in very very little oil (if you use too much you risk being burned later) in a good non stick frying pan. Meanwhile beat 3 eggs and add a pinch each of smoked paprika, dried chilli flakes and dried oregano, salt and pepper, mix up and pour the eggs over the veggies and tilt the pan so the whole base of the pan is coated in egg, sprinkle over about half the grated cheese and once the eggs look about half cooked, lay on a tortilla wrap. Press down gently so the Runny egg and melty cheese sticks to the wrap. When you can jiggle the pan and the egg slides around you know it’s cooked enough to do this next bit. TURN OF THE HEAT! We don’t want anyone starting fires. Lay a piece of greaseproof paper over the top of the pan and put a plate face down on the paper. Can you see where this is going??? This is why it was important not to use too much oil! Keeping a hand firmly on the plate, invert the pan so the egg and wrap are now sitting on the plate and greaseproof. Put the plate to one side for a moment and put the pan back on the heat. Add a little sprinkle of cheese directly into the pan, and slide the wrap and egg back into the pan, wrap side down, this way you’ll get really crispy cheesiness on the outside of the parcel. Then sprinkle a little more cheese on the egg, fold up the sides of the wrap with a spatula/fish slice. And cook, turning every now and again until the tortilla wrap and the cheese that’s stuck to the outside of it, is crispy and golden. Serve with a drizzle of sriracha. 

You could add any veg you like to this but just make sure it’s not too veg-heavy or the egg won’t hold together and go crispy and you’ll end up with a soggy wrap. A bit of bacon or cooked chicken would be nice in this too but I was working with what we had and sometimes I just fancy meat free. 


I can imagine this being really nice late night after you’ve been out for a few drinks but you MUST remember the two key safety steps:

!! Use hardly any oil or you’ll get scalded!!

!! Turn off the heat before placing the greaseproof on top of the pan or you’ll start a fire!!

Friday, 14 February 2020

Mediterranean Salmon with Lentils and Broccoli

Mediterranean Salmon with Lentils and Broccoli 


Valentines dinner tonight: oven roasted salmon with roasted courgettes and tomatoes, served on a bed of green lentils in a tomato, chilli and garlic sauce, with tenderstem broccoli. Hubby LOVED it! It was really tasty and only 3 syns for 0.5tbsp olive oil and 1 syn for the pouch of green lentils from Aldi. So 2 syns per person.


Ingredients:

2x boneless skinless salmon fillets
2x courgettes, split lengthways and chopped
1/2 punnet of baby plum tomatoes
1/2tsp dried oregano
1/2tsp dried basil
1tsp olive oil

1tsp crushed garlic
1/2tsp olive oil
1tsp finely chopped red chilli
2-3tbsp tomato purée
Pouch of Aldi Green Lentils
1/4 cup water
Splash balsamic vinegar
Splash lea and perrins

Tenderstem broccoli

Method:

1) preheat the oven to 170*C
2) prepare 2 sheets of foil, lined with a sheet of baking paper/greaseproof. Fold each sheet of foil and greaseproof in half (like a book) then open it back up ready to use them as parcels
3) trim the broccoli and slice the courgettes
4) fry the courgettes in a non stick pan with 1/2tsp olive oil till they start to colour
5) split the courgettes between the two parcels, add some cherry plum tomatoes
6) sprinkle on some dried oregano and dried basil to add extra flavour
7) pan fry the salmon in 1/2tsp olive oil for 1 minute per side (use a timer or it’ll overcook)
8 ) put the salmon on top of the courgettes and tomatoes
9) fold the paper and foil back down so it’s just resting on the salmon (this helps protect the salmon from overcooking but by not sealing the parcel it lets them roast rather than steam)
10) bake/roast in the oven for 15-18 minutes
11) while the parcels are baking, prep the lentils etc.
12) heat the pan again and add the last 1/2tsp olive oil, add crushed/grated garlic, finely chopped chilli and tomato purée, fry it off for a minute on a low heat.
13) add the lentils and toss in the tomato mixture, add in about 1/4 cup water from a recently boiled kettle. Add a splash of balsamic vinegar and a splash of Lea and perrins and let it cook to reduce the liquid
14) steam the broccoli in a tiered steamer for no more then 5 minutes
15) serve the lentils, encircling them with the broccoli, remove the salmon from the parcels and put on a plate for a moment while you tip the courgettes and tomatoes out of the parcels into the lentils along with any juices in there. Top with the salmon and serve.

Tuesday, 21 January 2020

Easy Egg Fried Rice


Last nights dinner - egg fried rice using ASDA diced lean bacon. So yummy and hubby took the leftovers into the office for lunch. 2 syns for half of everything in the pan.

Ingredients:

Asda diced lean bacon
Sliced chestnut mushrooms
Trimmed bunch of spring onions chopped
Frozen peas
Frozen sweet corn
2 chopped red peppers
Garlic
Fresh ginger
Chilli
Soy sauce
Syn free oyster sauce (sorry I can’t remember which one)
Aldi basmati rice pouch (2 syns per pouch)
Eggs beaten

Method:

1) in a large non-stick wok fry off the bacon and mushrooms, keep cooking till the moisture from the mushrooms has evaporated
2) add the rest of the veg and fry till the frozen veg is tender
3) remove from the pan and set aside
4) scramble the eggs in the wok and when they’re almost set, remove them from the pan and set aside
5) squeeze the rice pouches to break up the rice
6) fry the rice until it starts to toast stirring frequently
7) add the chilli, garlic and ginger, oyster sauce and soy sauce
8.) return the vegetable and bacon mix and eggs to the pan and stir everything together till it’s all piping hot again and well mixed

Friday, 17 January 2020

Quick Friday Night Curry

Quick Friday Night Curry

20 minutes to table! Get your hearty spice fix on! One pan dish. Oh and it’s completely vegan and if you serve it with something other than bread it’s gluten free too! BONUS!!!


Ingredients:

1tsp sunflower oil/fry light
1/2 red onion cut into chunks and the layers separated 
1 can potatoes, drained and rinsed and cut into even chunks
1 can chickpeas, drained
3 ripe tomatoes cut into chunks
1/2 cup frozen peas
2 handfuls of fresh baby leaf spinach 
2tbsp punch pooran (whole spices)
2tbsp curry powder of choice
2tsp chilli powder 
1tsp dried turmeric 


Method:

1) Heat a large non-stick frying pan over a high heat. Add oil/fry light and onion. Gently fry stirring frequently until the onions start to brown.

2) Add the potatoes and fry on a medium to high heat, stirring occasionally until the potatoes start to brown.

3) Add the whole spices/punch pooran and stir through the potatoes and onions until they are well distributed and you can smell the spices being activated by the heat. 

4) Add the chickpeas and peas and stir till warmed through.

5) Add the curry powder, turmeric and chilli powder and stir into the veg.

6) Add the tomatoes and a little water to stop the spices from burning and helps get the jammy caramelised juices off the bottom of the pan. 

7) Add the spinach on top and cook everything on a medium stirring occasionally until the spinach has wilted, everything is piping hot through and the moisture is the pan has evaporated. 

8) Serve with flatbread or popadoms.

Sunday, 12 January 2020

Sunday’s are for Food Prep

Sunday’s are for Food Prep

I like to take advantage of my days off work to prepare as much as possible in advance to avoid the typical pitfalls of trying to stick to a diet without having suitable food handy.


Typical Productive Sunday afternoon:

FREE protein snack pots - eggy muffins/quiches 


(FREE (P) bacon medallions in the bottom of muffin tins, filled with SPEED spinach, SPEED spring onions, chopped SPEED peppers and beaten FREE (P) egg, topped with sliced SPEED plum cherry tomatoes) baked at 200*C for 15-20 mins.

FREE +1xHEA Veggie and cheese snack pots 


(SPEED celery, SPEED carrots, SPEED red pepper, HEA 3x Babybel Lights)

Spicy Roasted Red Pepper and Carrot Soup 


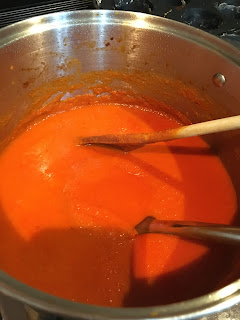
(SPEED white onion, SPEED fresh orange and yellow peppers, SPEED carrots, FREE drained and rinsed jar of roasted red peppers in brine, chopped garlic, chopped chilli, ground cumin, smoked paprika, Sriracha hot sauce (1/2syn per level tbsp), all brought to the boil and simmered till tender, then blended with a stick blender, till smooth.

I was a bit heavy handed with the chilli so added a touch of fat free creme fraiche to my bowl (aka wussy bowl ha ha).

PS: round pots are from Poundland, roasted peppers in brine are from B&M.

Sunday, 5 January 2020

Slow Cooker Dump Bags


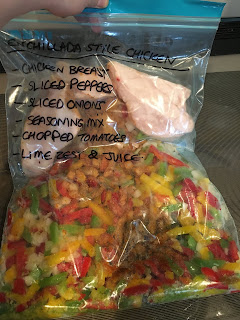
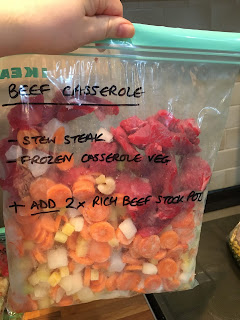
Really should uploaded this last week especially seeing as it was so popular Facebook. Came across an idea on Pinterest and thought I’d give them a go.  A couple of hours work for a couple of weeks of dinners. All you need is some decent ziplock bags/Tupperware, plenty of room in your freezer and that coolest of contraptions - the Slow Cooker.  You stick them in the freezer then just pull them out the night before to defrost then dump in the slow cooker with any extra ingredients like tinned tomatoes or mushroom soup etc. Should make dinners even easier through the week plus most of the veggies in them are already frozen so cost pennies.

A few things to note:

1) I used mostly already frozen veg. Quicker and easier otherwise I’d have to blanch stuff before freezing. And all the meat was raw. Chicken was frozen raw chicken breasts.
2) I googled crock pot dump bags for ideas
3) ingredients are written on the bags but I did them by eye so no quantities I’m afraid.
4) the bags I’m using are from Ikea but any good zip lock bag or indeed Tupperware would work.
5) it’s the first time I’ve done this so not sure how they’ll all turn out but thought I’d give it a go.


Friday, 3 January 2020

Samosa Pie


Trying to lose weight but really want some crunchy pie action? Then look no further!

This is my sped up version of a fantastic recipe by Tom Kerridge.
https://www.itv.com/thismorning/food/pork-samosa-pie-tom-kerridge-recipe
He dry roasts his mince in the oven to create a deeper flavour and uses raw potatoes so they absorb the spicy flavours in the stock. But this adds about an hour to the overall cooking time. So I cheated. You can (I did just last night in fact) get this on the table within 30 minutes of walking through the door after work.

My secrets to the speed:
A) I dry fry my mince in a non-stick pan till it starts to caramelise and catch in places. It gives the same effect as the dry roasting in the oven but much much quicker.
B) I used tinned cooked potatoes. Yes those things you can grab from the corner shop that come in water.
C) I used a rich beef stock pot with a little water instead of the beef consume and chicken stock Tom uses. It gives the same intense meaty flavour without having to wait an age for all the liquid to reduce.

I also had to work with the spices I had in the house (infinitely more now thanks to my amazing sister and brother in law for their kind Christmas gift but) I didn’t quite have the exact spices called for in the original recipe but made it work for me.

Serves 4
Prep time: 5 mins
Cooking time: 25 mins

Ingredients:
500g of 5%fat beef mince (feel free to swap pork mince here)
1x large white onion finely chopped
1tsp garlic purée
1x can of cooked potatoes in water (drained and chopped into even size pieces)
1x can chopped carrots (drained)
1x cup frozen peas
1x knorr rich beef stock pot
1x long green chilli (pricked with a knife in a couple of places to stop it exploding when cooked)
2tsp punch poran (whole spice mix includes: cumin, mustard seeds, fenugreek, nigella seeds, fennel seeds)
2-3tbsp curry powder
1 cup hot water

6x sheets filo pastry (removed from a fridge for a few minutes so it’s less brittle to work with)
1-2tbsp nigella seeds
Olive oil fry light

Method:
1) preheat oven to 200*C
2) heat non-stick frying pan on a high heat
3) dry fry mince stirring till all the liquid has evaporated and the meat has started to brown.
4) add onion to mince and fry till softened.
5) add chopped potatoes and carrots, along with the garlic purée and spices
6) fry till the spices are fragrant and everything is well coated in the seasoning
7) add the frozen peas, stock pot and hot water. Stir well till the stock pot has dissolved.

8) give it 5 mins on a high heat for some of the water to evaporate then decant into an ovenproof dish.
9) put scrunched your sheets of filo on top of mince mixture, spritz with a little fry light then sprinkle over the nigella seeds

10) bake in the oven for 10 mins till it’s golden and crispy. Then serve and enjoy!